
Showing posts with label blogging. Show all posts
Showing posts with label blogging. Show all posts
Saturday, July 9, 2011
 CSS is a fun thing to play with. With the growing development of cascading style sheet and with the accepting compatibility of new browsers, web designing is becoming more and more creative. We once used Photoshop to manually add drop shadows to images but now thanks to CSS3 you can add drop shadows to all your images automatically. We will learn today how to minimize the size of large images and how can we make them expand to their original size on mouse hover. I am sure you will love it :)
Please see a demo first,
How To add Drop Shadows and Enlarge Images on Mouse Hover?
The methods are really simple.- Go to Blogger > Design > Edit HTML
- Back up your template
- Search for ]]></b:skin>
- Just above ]]></b:skin> paste the following code,
.MBT-CSS3 img{
-webkit-transform:scale(0.7); /*Webkit 0.7 times the original Image size*/
-moz-transform:scale(0.7); /*Mozilla 0.7 times the original Image size*/
-o-transform:scale(0.7); /*Opera 0.7 times the original Image size*/
-webkit-transition-duration: 0.5s; /*Webkit: Animation duration*/
-moz-transition-duration: 0.5s; /*Mozilla Animation duration*/
-o-transition-duration: 0.5s; /*Opera Animation duration*/
opacity: 0.5;
margin: 0 10px 5px 0;
}
.MBT-CSS3 img:hover{
-webkit-transform:scale(1.1); /*Webkit: 0.5 times the original Image size*/
-moz-transform:scale(1.1); /*Mozilla 0.5 times the original Image size*/
-o-transform:scale(1.1); /*Opera 0.5 times the original Image size*/
box-shadow:0px 0px 30px gray;
-webkit-box-shadow:0px 0px 30px gray;
-moz-box-shadow:0px 0px 30px gray;
opacity: 1;
}
If you wish to further decrease the image size then decrease 0.7 or if you wish to further fade the image then decrease 0.5
You are almost done. Now when ever you want the image to appear with this effect, simply use this code,
<div class="MBT-CSS3">Upload your image to Blogger editor and replace Image URL Goes Here with your image link. You are done. Now visit your blog to see the effect working in action and yell out Bravo! :P
<img src="Image URL Goes Here" />
</div>
If you wish to add this effect to another image just keep on adding <img src="Image URL Goes Here" /> before </div>
This effect is compatible with latest versions of Mozilla, Safari, Opera, Chrome and as usual not that effective with boring IE. I just hope you liked it.
Saturday, July 9, 2011 0
Monday, July 4, 2011
 Many tutorials have already been published on how to display emoticons in BlogSpot comments but since unique content is what MBT always publishes, today we will learn on how to add a collection of cute Skype emoticons above Blogger comment form. The tutorial is as easy to understand as you can imagine! :)
Kindly have a look at the demo first,
Follow These Steps:
- Go to Blogger > Layout > Edit HTML
- Check the “Expand Widget Templates” box
- Search for,
<h4 id='comment-post-message'><data:postCommentMsg/></h4>4. Just below it paste the code below,
<div style=' width: 370px; text-align: left; border: 2px solid #0084ce; background: #FEF9EA; padding: 10px; color:#0084ce; font-weight:bold; '>Save your template and view your blog to see a rectangular block of emoticons as shown below,
<img border='0' src='https://blogger.googleusercontent.com/img/b/R29vZ2xl/AVvXsEi1eFmz9eqSJXMVM9jT50A4JptAYoedjzIAAHW0b1SjFK4AqSHzMW12BqTl-AvbvfPgKca0aa29zKp0-T9BneC7mKdt3w-dBDPckrKC23Hza5plb8g_7pauqFBg2GvbuYGMWvvwWzeLk24/s800/emoticon-0100-smile.gif'/> :a
 
<img border='0' src='https://blogger.googleusercontent.com/img/b/R29vZ2xl/AVvXsEgkwZa7_S4jZa9dWMVldTw5cx7ZEnsxI2ZyD1aaHukIi2PbjeoW_3aiBUqO5ETNWFL24Vktm-JgwBXhUzfRCJB4vysdpeXfN_B5zU4ZgQrZ8_wmTDtygp0JgfyO87HOnc7L0QbXaJOEEH0/s800/emoticon-0101-sadsmile.gif'/> :b
 
<img border='0' src='https://blogger.googleusercontent.com/img/b/R29vZ2xl/AVvXsEjzSaZDWMJsjhstcmvm0_vKaUkMSH2S7PNcPe783lMHuZs58wps7ySiWdXa3v7FqmReXdq35Efwa1l4um6dOrTneF4sjF0wqZvtqvwoiIsFweHiIkdrZKJLvkDPmcq9ulHA3fTUeEyFSbk/s800/emoticon-0102-bigsmile.gif'/> :c
 
<img border='0' src='https://blogger.googleusercontent.com/img/b/R29vZ2xl/AVvXsEitfUP5lwYISawQdBfAA76JcDAcv_CQYlZcVQ8ItKahTwysIMIgG0R_Y85zy78kCiZlMY9iuu0rFSBOIH1hjX1iflil97GR5WWh09RMTg1J51OQrJL871OtP0Evp_cDuR5_HzRfW9lFk_Y/s800/emoticon-0105-wink.gif'/> :d
 
<img border='0' src='https://blogger.googleusercontent.com/img/b/R29vZ2xl/AVvXsEgL-Y077QZkrxnprvHY5OeiKVNLFmPq_vFIk7H2og_jKAoN20SMP75GpHV2ZDpzvcVFPWu-ZP3ZW_tFe84msUGHXhbHaWHc6Nd2xw4xdlmuE1lkA8-iWsWeqEU_UbCt7xqefHnewpZGjhU/s800/emoticon-0104-surprised.gif'/> :e
 
<img border='0' src='https://blogger.googleusercontent.com/img/b/R29vZ2xl/AVvXsEjs2LUWT125FombGyA55uf2B8R3ihjVs04m333SoqMzTkr3B8_1hGouKF060PVylZ7eFeXIHvSEdztj0FCQZJkPK_LP1axRs0La5cJ2XibjGAuIGNUTLK9tS2udGxJPdv3aJa98G00-KS4/s800/emoticon-0106-crying.gif'/> :f
 
<img border='0' src='https://blogger.googleusercontent.com/img/b/R29vZ2xl/AVvXsEhZyLqNVvEc0LVxE_7e_bS5U5X6aaHRxKe-Ozw-XK_jJFxYu1_Sd_w9VJdZI19QFYqdX4HWAG734KwmmctGPFXk1pJSUceirHCMk_CRaemEXrjoTD50cr0p8cp9fIb6idk1sYenNstAsUo/s800/emoticon-0109-kiss.gif'/> :g
 
<img border='0' src='https://blogger.googleusercontent.com/img/b/R29vZ2xl/AVvXsEhjHmMY58YaTYE1ziZcQeXNmE0CC3dxaQvYd-Yks-Mhxqzm57WlhRPZGzdt5hdCmbc-pmeqHoIFpIqEH8YssNqUMGks9fYYfemoHG7GffWNQxP-NeF_y9_GKuy6hELXcroXg05PY3Ncujk/s800/emoticon-0111-blush.gif'/> :h
 
<img border='0' src='https://blogger.googleusercontent.com/img/b/R29vZ2xl/AVvXsEgb_kd-SHPiI-_-DAwbj3L5atf-sT38727G77dOCKgWGNh1R87ps_7mF2IYxrlYNGH7OZrO9968HPqOP8e1i5niuslR6Zi2VvwEJWlv-VWKBzUPZE04aCViEKut_KMYwHzzO-08KRnnUS4/s800/emoticon-0110-tongueout.gif'/> :i
 
<img border='0' src='https://blogger.googleusercontent.com/img/b/R29vZ2xl/AVvXsEg7j6DrP30eOzpWH3g3g9BpkG9i8I5p4pzDXH20g2bWx00W4xzfJNiNPK9VQ2zZNBWBbOaOZV-id2O2mQ2ViE4lqB_nUwwqb2I_XPeiRW0RLWG3uZ9eRZII-_Vhk9S32QGull0pf377Gv0/s800/emoticon-0126-nerd.gif'/> :j
 
<img border='0' src='https://blogger.googleusercontent.com/img/b/R29vZ2xl/AVvXsEiysGhTYNNLhSP926ODJpwDANFRFCIwwLWCR7XKj1Q1qNuCmfMt9uDNFXrd_ZyeGjkvptDcPCv67tq5w0_805rIRbjzlOruYN4jeDGq0xflDVoQYlmDbC1XRkFr2BP8IOShnrn7kBb3sdE/s800/emoticon-0103-cool.gif'/> :k
 
<img border='0' src='https://blogger.googleusercontent.com/img/b/R29vZ2xl/AVvXsEgJ36h7bFsz6U_oENGHE9dFtaPQ1W8zf9cIEUeChha82ipDsAxVxWfyS51vdR6kCvwvKGNU97rU2EQngUdEfMuCFpi5TkJn0s4mZmw3gsD7Q3KB5JjtL_l20h7oAiIjjb6GJHIMpHD3KXE/s800/emoticon-0130-devil.gif'/> :l
 
<img border='0' src='https://blogger.googleusercontent.com/img/b/R29vZ2xl/AVvXsEjgDIERzsKxgiWiwSGu9Z3_OoHcaoYIn_41uZwEPHDRfz7I7605OvR4I_pSrejPAY3_DdFkUZobepJNZHHEttS0O6U1XH3q-a9BHNKQmIjt0UTE0H-d6OJM3NLK4vrvKVqvWEgyU0aZDes/s800/emoticon-0133-wait.gif'/> :m
 
<img border='0' src='https://blogger.googleusercontent.com/img/b/R29vZ2xl/AVvXsEiqoqunK_H6HpeKePu7H-oc_B4gQQqfdIu0qqBzr9wIMJe9LnB7ryYYIAKIdsCuNc7KFyL0R-KTr8yryLCauEXzdFS8NkbpcWqs_SvZS1Xz-eY8vGd6yvNQ8vqmCXzzWBCpHk8JH9e5f6w/s800/emoticon-0137-clapping.gif'/> :n
 
<img border='0' src='https://blogger.googleusercontent.com/img/b/R29vZ2xl/AVvXsEiuaxAi0gSmw_BfmIESF3_xe1k8iywQA_chFyFBJoHM8UcnAvdwX6fpLsTgHtgKrc6fHGEhc0ER35Mz0Za9pwBsdH66J6Q8HkeR5rTThJunMnmHWlD585-TGqKGSc1j7RRdDVUBIJp95EA/s800/emoticon-0136-giggle.gif'/> :o
 
<img border='0' src='https://blogger.googleusercontent.com/img/b/R29vZ2xl/AVvXsEht3kb02PJLv4E7T62CErfdJnsjtQvEGZL8nNFuy35Q6FIz4UAlzOeYGNQm-GbbBPS9QQQTctC3yeV6yjAFN8fT8pWQBqICsVUNCcJsbuYer90x1h4Lj-kVpUDr33XThI5jNfA0kJT_zJA/s800/emoticon-0141-whew.gif'/> :p
 
<img border='0' src='https://blogger.googleusercontent.com/img/b/R29vZ2xl/AVvXsEiticwqwtprIV0rFakv-b8xPKcIxv1ZmupyFEGOMHmWlz2oIhMYeSRSn1mATTrHSegcoTgEGEjP0Fj5ld2H2GRxOREey-9GpcupNRjFhA9gq7TSFgkso3YNix2kdquayvUWReWc8c0rT80/s800/emoticon-0148-yes.gif'/> :q
 
<img border='0' src='https://blogger.googleusercontent.com/img/b/R29vZ2xl/AVvXsEjRZtacoOzWQOHd2XEaS2X6g07rk50WdLrQFl8LepJEzb0edlWPnuLpfR5Cie9IQpLXVFGlnDkiXeMEiQxl3DpKyZ84zekJJinLntUtvLhCDxcIQ1NPj2sz1-a9masTnpsPPliMDG8YieU/s800/emoticon-0149-no.gif'/> :r
 
<img border='0' src='https://blogger.googleusercontent.com/img/b/R29vZ2xl/AVvXsEjst74Ek5inMCkfDAe6WfCQH1IowqZsO9ufQgh9fx14Or1tDwOe58dh6p7zanN9o3sCoysdfTM0Rx7oKWCRJXQjNVqdXKaopc3V7qTJeZh2RYvM1UUMOU6dMTw3crcvKhFc2fyPMGfp_wI/s800/emoticon-0178-rock.gif'/> :s
 
<img border='0' src='https://blogger.googleusercontent.com/img/b/R29vZ2xl/AVvXsEjaypsanw_95VYOzKhd3nXXsNDxoaEH3i9lIh7DAgkDYZwFKdSfSn7yT4z60zZJevgdkfPABNtlqCc-6Tjd6oESGZvc8S1wrnwEs0vHlL9EEPlIE81CS8F4DK62UZqRZjaepDuQlMXOEBQ/s800/emoticon-0155-flower.gif'/> :t
</div>
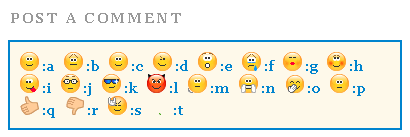
Note:- To change the appearance of the rectangular block simply edit the code in bolded green colour
5.. Now find </body> and paste the code below just above </body>
Note:- You can also try adding the code below just above </head> instead.
<script type='text/javascript'>
//<![CDATA[
a = document.getElementById('comments');
if(a) {
b = a.getElementsByTagName("DD");
for(i=0; i < b.length; i++) {
if (b.item(i).getAttribute('CLASS') == 'Author-comment-body' , 'comment-body') {
_str = b.item(i).innerHTML.replace(/:j/gi, "<img src='https://blogger.googleusercontent.com/img/b/R29vZ2xl/AVvXsEg7j6DrP30eOzpWH3g3g9BpkG9i8I5p4pzDXH20g2bWx00W4xzfJNiNPK9VQ2zZNBWBbOaOZV-id2O2mQ2ViE4lqB_nUwwqb2I_XPeiRW0RLWG3uZ9eRZII-_Vhk9S32QGull0pf377Gv0/s800/emoticon-0126-nerd.gif' alt='' class='smiley'/>");
_str = _str.replace(/:k/gi, "<img src='https://blogger.googleusercontent.com/img/b/R29vZ2xl/AVvXsEiysGhTYNNLhSP926ODJpwDANFRFCIwwLWCR7XKj1Q1qNuCmfMt9uDNFXrd_ZyeGjkvptDcPCv67tq5w0_805rIRbjzlOruYN4jeDGq0xflDVoQYlmDbC1XRkFr2BP8IOShnrn7kBb3sdE/s800/emoticon-0103-cool.gif' alt='' class='smiley'/>");
_str = _str.replace(/:l/gi, "<img src='https://blogger.googleusercontent.com/img/b/R29vZ2xl/AVvXsEgJ36h7bFsz6U_oENGHE9dFtaPQ1W8zf9cIEUeChha82ipDsAxVxWfyS51vdR6kCvwvKGNU97rU2EQngUdEfMuCFpi5TkJn0s4mZmw3gsD7Q3KB5JjtL_l20h7oAiIjjb6GJHIMpHD3KXE/s800/emoticon-0130-devil.gif' alt='' class='smiley'/>");
_str = _str.replace(/:m/gi, "<img src='https://blogger.googleusercontent.com/img/b/R29vZ2xl/AVvXsEjgDIERzsKxgiWiwSGu9Z3_OoHcaoYIn_41uZwEPHDRfz7I7605OvR4I_pSrejPAY3_DdFkUZobepJNZHHEttS0O6U1XH3q-a9BHNKQmIjt0UTE0H-d6OJM3NLK4vrvKVqvWEgyU0aZDes/s800/emoticon-0133-wait.gif' alt='' class='smiley'/>");
_str = _str.replace(/:n/gi, "<img src='https://blogger.googleusercontent.com/img/b/R29vZ2xl/AVvXsEiqoqunK_H6HpeKePu7H-oc_B4gQQqfdIu0qqBzr9wIMJe9LnB7ryYYIAKIdsCuNc7KFyL0R-KTr8yryLCauEXzdFS8NkbpcWqs_SvZS1Xz-eY8vGd6yvNQ8vqmCXzzWBCpHk8JH9e5f6w/s800/emoticon-0137-clapping.gif' alt='' class='smiley'/>");
_str = _str.replace(/:o/gi, "<img src='https://blogger.googleusercontent.com/img/b/R29vZ2xl/AVvXsEiuaxAi0gSmw_BfmIESF3_xe1k8iywQA_chFyFBJoHM8UcnAvdwX6fpLsTgHtgKrc6fHGEhc0ER35Mz0Za9pwBsdH66J6Q8HkeR5rTThJunMnmHWlD585-TGqKGSc1j7RRdDVUBIJp95EA/s800/emoticon-0136-giggle.gif' alt='' class='smiley'/>");
_str = _str.replace(/:p/gi, "<img src='https://blogger.googleusercontent.com/img/b/R29vZ2xl/AVvXsEht3kb02PJLv4E7T62CErfdJnsjtQvEGZL8nNFuy35Q6FIz4UAlzOeYGNQm-GbbBPS9QQQTctC3yeV6yjAFN8fT8pWQBqICsVUNCcJsbuYer90x1h4Lj-kVpUDr33XThI5jNfA0kJT_zJA/s800/emoticon-0141-whew.gif' alt='' class='smiley'/>");
_str = _str.replace(/:q/gi, "<img src='https://blogger.googleusercontent.com/img/b/R29vZ2xl/AVvXsEiticwqwtprIV0rFakv-b8xPKcIxv1ZmupyFEGOMHmWlz2oIhMYeSRSn1mATTrHSegcoTgEGEjP0Fj5ld2H2GRxOREey-9GpcupNRjFhA9gq7TSFgkso3YNix2kdquayvUWReWc8c0rT80/s800/emoticon-0148-yes.gif' alt='' class='smiley'/>");
_str = _str.replace(/:r/gi, "<img src='https://blogger.googleusercontent.com/img/b/R29vZ2xl/AVvXsEjRZtacoOzWQOHd2XEaS2X6g07rk50WdLrQFl8LepJEzb0edlWPnuLpfR5Cie9IQpLXVFGlnDkiXeMEiQxl3DpKyZ84zekJJinLntUtvLhCDxcIQ1NPj2sz1-a9masTnpsPPliMDG8YieU/s800/emoticon-0149-no.gif' alt='' class='smiley'/>");
_str = _str.replace(/:s/gi, "<img src='https://blogger.googleusercontent.com/img/b/R29vZ2xl/AVvXsEjaypsanw_95VYOzKhd3nXXsNDxoaEH3i9lIh7DAgkDYZwFKdSfSn7yT4z60zZJevgdkfPABNtlqCc-6Tjd6oESGZvc8S1wrnwEs0vHlL9EEPlIE81CS8F4DK62UZqRZjaepDuQlMXOEBQ/s800/emoticon-0155-flower.gif' alt='' class='smiley'/>");
_str = _str.replace(/:t/gi, "<img src='https://blogger.googleusercontent.com/img/b/R29vZ2xl/AVvXsEjst74Ek5inMCkfDAe6WfCQH1IowqZsO9ufQgh9fx14Or1tDwOe58dh6p7zanN9o3sCoysdfTM0Rx7oKWCRJXQjNVqdXKaopc3V7qTJeZh2RYvM1UUMOU6dMTw3crcvKhFc2fyPMGfp_wI/s800/emoticon-0178-rock.gif' alt='' class='smiley'/>");
_str = _str.replace(/:a/gi, "<img src='https://blogger.googleusercontent.com/img/b/R29vZ2xl/AVvXsEi1eFmz9eqSJXMVM9jT50A4JptAYoedjzIAAHW0b1SjFK4AqSHzMW12BqTl-AvbvfPgKca0aa29zKp0-T9BneC7mKdt3w-dBDPckrKC23Hza5plb8g_7pauqFBg2GvbuYGMWvvwWzeLk24/s800/emoticon-0100-smile.gif' alt='' class='smiley'/>");
_str = _str.replace(/:b/gi, "<img src='https://blogger.googleusercontent.com/img/b/R29vZ2xl/AVvXsEgkwZa7_S4jZa9dWMVldTw5cx7ZEnsxI2ZyD1aaHukIi2PbjeoW_3aiBUqO5ETNWFL24Vktm-JgwBXhUzfRCJB4vysdpeXfN_B5zU4ZgQrZ8_wmTDtygp0JgfyO87HOnc7L0QbXaJOEEH0/s800/emoticon-0101-sadsmile.gif' alt='' class='smiley'/>");
_str = _str.replace(/:c/gi, "<img src='https://blogger.googleusercontent.com/img/b/R29vZ2xl/AVvXsEjzSaZDWMJsjhstcmvm0_vKaUkMSH2S7PNcPe783lMHuZs58wps7ySiWdXa3v7FqmReXdq35Efwa1l4um6dOrTneF4sjF0wqZvtqvwoiIsFweHiIkdrZKJLvkDPmcq9ulHA3fTUeEyFSbk/s800/emoticon-0102-bigsmile.gif' alt='' class='smiley'/>");
_str = _str.replace(/:d/gi, "<img src='https://blogger.googleusercontent.com/img/b/R29vZ2xl/AVvXsEitfUP5lwYISawQdBfAA76JcDAcv_CQYlZcVQ8ItKahTwysIMIgG0R_Y85zy78kCiZlMY9iuu0rFSBOIH1hjX1iflil97GR5WWh09RMTg1J51OQrJL871OtP0Evp_cDuR5_HzRfW9lFk_Y/s800/emoticon-0105-wink.gif' alt='' class='smiley'/>");
_str = _str.replace(/:e/gi, "<img src='https://blogger.googleusercontent.com/img/b/R29vZ2xl/AVvXsEgL-Y077QZkrxnprvHY5OeiKVNLFmPq_vFIk7H2og_jKAoN20SMP75GpHV2ZDpzvcVFPWu-ZP3ZW_tFe84msUGHXhbHaWHc6Nd2xw4xdlmuE1lkA8-iWsWeqEU_UbCt7xqefHnewpZGjhU/s800/emoticon-0104-surprised.gif' alt='' class='smiley'/>");
_str = _str.replace(/:f/gi, "<img src='https://blogger.googleusercontent.com/img/b/R29vZ2xl/AVvXsEjs2LUWT125FombGyA55uf2B8R3ihjVs04m333SoqMzTkr3B8_1hGouKF060PVylZ7eFeXIHvSEdztj0FCQZJkPK_LP1axRs0La5cJ2XibjGAuIGNUTLK9tS2udGxJPdv3aJa98G00-KS4/s800/emoticon-0106-crying.gif' alt='' class='smiley'/>");
_str = _str.replace(/:g/gi, "<img src='https://blogger.googleusercontent.com/img/b/R29vZ2xl/AVvXsEhZyLqNVvEc0LVxE_7e_bS5U5X6aaHRxKe-Ozw-XK_jJFxYu1_Sd_w9VJdZI19QFYqdX4HWAG734KwmmctGPFXk1pJSUceirHCMk_CRaemEXrjoTD50cr0p8cp9fIb6idk1sYenNstAsUo/s800/emoticon-0109-kiss.gif' alt='' class='smiley'/>");
_str = _str.replace(/:h/gi, "<img src='https://blogger.googleusercontent.com/img/b/R29vZ2xl/AVvXsEhjHmMY58YaTYE1ziZcQeXNmE0CC3dxaQvYd-Yks-Mhxqzm57WlhRPZGzdt5hdCmbc-pmeqHoIFpIqEH8YssNqUMGks9fYYfemoHG7GffWNQxP-NeF_y9_GKuy6hELXcroXg05PY3Ncujk/s800/emoticon-0111-blush.gif' alt='' class='smiley'/>");
_str = _str.replace(/:i/ig,"<img src='https://blogger.googleusercontent.com/img/b/R29vZ2xl/AVvXsEgb_kd-SHPiI-_-DAwbj3L5atf-sT38727G77dOCKgWGNh1R87ps_7mF2IYxrlYNGH7OZrO9968HPqOP8e1i5niuslR6Zi2VvwEJWlv-VWKBzUPZE04aCViEKut_KMYwHzzO-08KRnnUS4/s800/emoticon-0110-tongueout.gif' alt='' class='smiley'/>")
b.item(i).innerHTML = _str;
}
}
}
//]]>
</script>
6. Save your template and view the beautiful change! :D
The Emoticons Will appear In Both Readers and Author’s Comments!
As you know the yahoo smileys tutorials has one disadvantage and that is that the emoticons appear only in readers comments and can not be displayed in author comments. In order to make the emoticons appear even in Authors comment block then simply replace the code in bolded red colour above (i.e Author-comment-body ) with the CSS class for blog owners customized comments. If you do not know how to do it then simply share your blog URL and I will let you know what code should you paste instead of Author-comment-body
How did you find it?
I made it as simple as it could be and I hope it will add an extra sweet flavor to your blogs. The codes for the emoticons are made easy so that readers could easily use an emoticon of their choice. You can increase the number of emoticons and can also customize the look and feel of the rectangular box of emoticons that will appear above the comment form. I wrote this in hurry so if you have any questions just drop me a hi! :>>Monday, July 4, 2011 3
Sunday, June 26, 2011
 I shared a tutorial yesterday on 14 amazing ways to stylize Blogger Blockquote and today I have a really interesting and exceptional blockquote for those who write tutorial based articles on their blogs and websites. I have created two blockquotes, the first one has no number list while the second one comes with automatic number list and looks like your notebook diary. The number list starts at #1 and end at #112. Both of these blockquotes can easily be customized to suit your web layout.
 So let’s have a look at each one of them first.
Blockquote With Auto Number List:

Blockquote Without Number List:

Liked the difference? Now let’s learn how to add each one of them to your Blogger Blogs.
Adding Blockquote With Auto Number List To Blogger
To add this blockquote to blogger, follow the simple steps below,- Go to Blogger > Layout > Edit HTML
- Backup your template
- Search for .post blockquote and delete it along with all its occurrences. In most templates the codes look like this,
.post-body blockquote { line-height:1.3em; }
If you couldn’t find such code then it is OK.
OR
.post blockquote{ bla bla bla} - Now search for ]]></b:skin> and just above ]]></b:skin> , paste the code below,
blockquote {Customization:-
background: #fff url(https://blogger.googleusercontent.com/img/b/R29vZ2xl/AVvXsEjdYiA_adSbYeiiY_sFUjm9Wa_Ch2ajy2kp6O4ib9otV-EVDkjcJK_K6EVpsCMMUY5Mn8oDaKyWgEGzR6INsvV00xBvziRIrw73pyILuY09jb1QRn3JjoZ4nKIweyO9m1JdeahwDfkWqH0/s1600/notebook-with-numbers.gif) repeat-y;
margin: 0 20px;
padding: 0px 20px 5px 55px;
color:#7a7a7a;
font: bold 0.9em "Comic Sans MS", verdana;
line-height: 153%;
}
blockquote p {
margin: 0;
}
You can also change the Number list background by replacing the bolded image link in the code above with the image URLs of one of these blockquotes.
Tip:- Right Click the links below each blockquote and choose Save Link As Or Copy Link Location to its image URL.
font :- It includes font style, size and type respectively. Match the colours with the code above for reference. Font style can be bold, normal , italic or bold italic


color :- This refers to text colour. You can use a different font colour using our color chart
Adding Blockquote With No Number List To Blogger
To add this blockquote simply follow the same steps as shared for the blockquote with auto number list. But for step#4 paste the code below instead,blockquote {You can replace the Background Image link with one of these.
background: #fff url(https://blogger.googleusercontent.com/img/b/R29vZ2xl/AVvXsEgxv0X6y1SjN9XS6GhJuIILp_lBcJhddCl0dfyNE8dG66NxK5RGHTo0jVOZVKIZvJhsYQmp0tDPnOoM3vZIO-kloLT6ldLvD7Hxy1D3A3fK1PUMipiYl1MVuuty6-6SIZGHmw-jxPcG5UQ/s400/notebook.gif) repeat-y ;
margin: 0 20px;
padding: 20px 20px 20px 55px;
color:#7A7A7A;
font: bold 0.9em "Comic Sans MS", verdana;
line-height: 155%
}
blockquote p {
margin: 0;
}
Tip:- Right Click any of the blockquote images below and choose Save Link As Or Copy Link Location to get its image URL.


That’s All!
Note:- If you want to increase the number range for the blockquote with auto number list or if you want to create an image with your custom colours than I can provide you the PDF source file for it. But it will be given to subscribers only. If you haven’t subscribed yet, kindly do so to avail unlimited download resources from us to you.Let me know how was this new discovery :)
Sunday, June 26, 2011 6
Friday, June 24, 2011
 Google Fonts API as I previously mentioned in Part -1 of the post "How To use Google fonts in Blogger?" is of immense importance when it comes to using any font style you wish for your web designs without having to bother whether or not the fonts are installed on a visitors computer or not. The fonts are stored on Google servers and you simply need to embed them in your templates to let the fonts appear on your blog. I demonstrated in great detail in Embedding Google fonts in Blogger Post about how can you use the Google Fonts Previewer tool and add the embeddable code and CSS code to your Blogger templates. Today we will learn how would you use these font in Blogger posts, titles, block quotes, sidebars, headers, footers etc. Kindly see a demo first:
To learn how to do it simple follow up:
Choosing a Font Style and Embedding the Font
- Go To Google Font Previewer
- Choose Your selected font style and then copy the first line of code as shown below,

This line will look similar to the one below,
<link href=http://fonts.googleapis.com/css?family=Aclonica:regular
rel="stylesheet" type="text/css" >
You will have to add a back slash "/" at the end of the above link like this,
<link href=http://fonts.googleapis.com/css?family=Aclonica:regular
rel="stylesheet" type="text/css" />
3. Go To Blogger > Design > Edit HTML
4. Backup your template
5. Search For </head> and just above it paste the code you copied from Font previewer like this,
<link href=http://fonts.googleapis.com/css?family=Aclonica:regular
rel="stylesheet" type="text/css" />
</head>
6. Save your template and follow the next part of the tutorial.
After you have embedded the font in your templates, you will have to apply the effects to selected areas of your blog like Header Title, Post title and Sidebar. To do that follow the steps below,
How To Style Post Titles in Blogger?
- Go To Blogger > Design > Edit HTML
- Backup your template
- Search For the following code in blue,
.Post h3 {
....
...
.... }
4. Inside the above code you will find this line or a similar one,
.Post h3 {
....
font-family: arial, verdana;
.... }
5. Simply replace it with the Second Line which you can get from the font previewer

Like this,
.Post h3 {
....
font-family: 'Aclonica', serif;
.... }
6. Hit Save and you are done!
7. Preview your blog to see your Post titles appearing beautifully!
How To Style Sidebar Titles in Blogger?
All steps are same as we discussed for post titles. Here instead of searching for .post h3, search for,
.Sidebar h2{
....
...
.... }
and replace the font-family with your Second Line of Code like this,
.Sidebar h2 {
....
font-family: 'Aclonica', serif;
.... }
Save your template to see the effect.
Ps: Since the CSS coding for each template may differ so feel free to ask me for any help if needed. Have Fun!
Friday, June 24, 2011 0
 By default almost widgets in blogger blogs are editable. By Clicking the edit button, you can either perform edit, remove or cancel functions. You may have observed that some widgets can not be removed from page elements for example the Header widget which lets you add a background image to your header or add your site logo. All those widgets which can not be removed are LOCKED and we learn today how to UNLOCK those widgets. We will also learn how to LOCK any widget we want so that it could only be edited but not removed.
How To LOCK/UNLOCK a Widget in Blogger?
- Go To Blogger > Design
- You will see many widgets in your page element section. Get the ID of the widget you want to remove. You can get the widgetID by placing your mouse cursor at the Edit link of that specific widget. You will see a link appearing near the status bar of your Mozilla/Chrome browser like this,

3. Simply note down the widgetID which in my case is HTML12. You widget ID is one that appears between widgetid= and &action
The Widget that you want to lock looks like this in UNLOCK mode,
UNLOCK MODE:


You can clearly see that there are three buttons which are REMOVE, CANCEL and SAVE
Now we want to delete the REMOVE button so that the widget could only be edited but not removed.
4. Now go to Blogger > Design > Edit HTML
5. Backup your template
6. Search for your widget ID. (In my case I will search for HTML12
7. You will find a code similar to this,
<b:widget id='HTML12' locked='false' title='Subscribe Now!' type='HTML'/>8. Now to LOCK the widget simply let locked to true
9. Save your template and Your Widget is now LOCKED.
Go to Page Elements section and you will see that your widget has no REMOVE button now.
LOCKED MODE:


To UNLOCK the widget back, simply repeat the same process and change locked to false
That's all! Have fun :)
 We can make a custom navbar using the Blogger Official Search and Navbar widget provided in different color schemes. This is again a great trick using the Iframe Technique. This idea came into my mind just last night when I observed that the source file of our blog had two Iframed widgets one is the poll widget and another is the Navbar. Fortunately, this is again a first time shared tutorial by us. Although we often remove Blogger Navigation bar but its Search function and share and follow links can prove very important.
 Below you can see a customized version of the same navbar in two modes.
When users Log in, they will see this:

When users Log out of Blogger, they see this:

On clicking the share link, readers can share your blog post on Twitter, Facebook, Google Buzz or Google Reader.

On clicking the follow button, you can follow the blog updates:

The following Navigation colours are available:
TAN:

BLACK:

SILVER:

BLUE:

Add Blogger Navbar To Sidebar
You can use the code below to add the Navbar anywhere you want and not just the sidebar. You can add it to your blog posts also. To add the widget to your sidebar simply do this:- Go to Blogger > Design
- Choose a HTML/JavaScript Widget
- and Paste the code below inside it,
<iframe src="http://www.blogger.com/navbar.g?targetBlogID=8193278726666811965& blogName=My+Blogger+Tricks&publishMode=PUBLISH_MODE_HOSTED& navbarType=SILVER&layoutType=LAYOUTS& searchRoot=http%3A%2F%2Fwww.mybloggertricks.com%2Fsearch& blogLocale=en&homepageUrl=http%3A%2F%2Fwww.mybloggertricks.com%2F&" marginwidth="0" marginheight="0" scrolling="no" frameborder="0" height="30px" width="237px" id="navbar-iframe" allowtransparency="true" title="Blogger Navigation and Search"></iframe>
Make these changes:
- Replace 7193277726666811965 with your BLog ID. Go To Blogger > Design and now look in your browser address bar, you find a long digit code. Copy it and paste it in place of this number 7193277726666811965
- Replace My+Blogger+Tricks with your Blog Name. It is the name of your blog that you see in your blogger dashboard. Remember to separate each word with a plus sign (+)
- Replace SILVER with your prefered colour scheme in capital letters. You can try four colour schemes which are : 1) BLUE 2) BLACK 3) SILVER and 4) TAN
- Replace www.MyBloggerTricks.com with your blog link (exclude http://) If your blog URL is http://xyz.blogspot.com then simply write xyz.blogspot.com
4. Save your widget and you are done!
View your blog and start playing with the official search box along with the free follow and share option. Have fun!
Wednesday, June 22, 2011
 Just two days ago on June 08, 2011, Blogger Software engineer, Jiho Han announced the most awaited news of Blogger Mobile Templates which means that now all Blogger Blogs can easily be made compatible with any mobile device! The Google Blogger Team has finally released the mobile version option for all blogs, may that be Google's 27 Template Designer templates or your own heavily customized template. It works just perfect on all blogger templates! With growing use of iPhones, androids and latest devices, a mobile traffic will soon turn out to be the biggest blessing for your website. This is how your blog will look like in a mobile phone,


How To Show the Mobile Version Of Your Blog?
Simply follow these steps,- Go To Blogger > Settings > Email & Mobile Tab
- Click on the option that says "Yes, on mobile devices, show the mobile version of my template"

3. Click the "Save Settings" button at the bottom and you are done!
Now Click the "Mobile Preview" button to see how your blogger blog will show up in an Iphone. Enjoy this great functionality and keep loving Blogger! :)
Wednesday, June 22, 2011 0
Monday, June 20, 2011
 Yes! you can blog offline. With growing technology like Windows Live Writer blogging is no more limited to your dashboard. You can write, save and publish posts right from your computer without signing in your blogger account. Blogger HTML editor lacks many features when it comes to writing a good looking post. On contrary windows live writer is a software built by Microsoft Corporation which contains every feature that Blogger lacks.
I hate blogging without Windows Live Writer! I am sure many bloggers would agree with me on this point.
Some of the things you can’t do with Blogger HTML editor are,
- You can not write HTML code just the way it looks in blogger editor because the code is interpreted as a command and blogger editor converts it to how it may look in a browser.
- You can’t resize an image to whatever size you like because you are provided with only three options i.e Small, Medium and Large size.
- The font type and font size is limited.
- You can not undo what you have done (Going backward).
- You can’t align images to the left or right of your intro paragraph.
- You can not add effects to your images, like shadow effect, rounded corners, emboss, blur etc.
- You can not post an image in its original size
- You can not insert tables in your posts because no table option exists
- You can not open a link in a new window unless you edit the HTML
- You can not add a world map to your posts
- And much more……………

Moreover your images can be displayed in two different ways look below,
 Selecting the photo album option will display your images in a scattered style (with a view album link below your scattered images),
So go and download it right now by clicking the link below.
DOWNLOAD WINDOWS LIVE WRITER NOW!
To download the Latest version directly from windows live site then click here
TROUBLESHOOT:
If you get an error saying that “your windows installer is out dated” then run the following setup (below) before windows live setup (above)
Download Latest Windows installer here
Enjoy Blogging with better comfort from now onwards! Get in love with it

Monday, June 20, 2011 0
Thursday, June 16, 2011
 With the interesting discovery of Custom blogger Navbars, its now time to add yet another embeddable widget into your blogger blogs. You have often seen me adding the poll results to the posts and I do it using the same Iframe technique we discussed yesterday. The Blogger poll widget results are stored on Google servers and even when you delete the Poll widget from your sidebar the results will still remain stored forever. What I often do is that once the polling is done, I remove the poll widget from the sidebar and then add it to a post and discuss the poll results. See this poll results as an example,
Interesting? Now lets learn how to do that.
Copy The Poll Widget Code From your Source File
- Visit your Blog and press Ctrl + U
- Next press Ctrl + F and search for this,
http://www.google.com/reviews/polls3. You will find a code that starts with iframe and ends with iframe, something like this,
<iframe allowtransparency='true' frameborder='0' height='180' name='poll-widget-1533663100889025859' src='http://www.google.com/reviews/polls/ display/-1533663100889025859/blogger_template/run_app?hideq=true&purl=http%3A%2F%2F www.mybloggertricks.com%2F' style='border:none; width:100%;'></iframe>
4. Simply copy that code and paste it wherever you want in your blog post!
5. That's it!
Once you have copied the code from your blog's source file then you can happily delete the poll widget from the sidebar by going to Blogger > Design > Page Elements
Hope you find it useful and easy. If you faced any difficulty just shoot me a comment. Peace out brothers! =)
Thursday, June 16, 2011 0
Wednesday, June 15, 2011
 Adding icons or images next to Hyperlinks indeed brands your links. The tutorial today will let you add an icon next to any link you want. It is different from our previous post where I shared how can you add icons to hyperlinks using CSS3. Most of you requested that how can you add an icon next to just a simple URL with no file extension, so this post will answer all your questions.
Adding Icons Next To Hyperlinks in Blogger
- Go To Blogger > Design> Edit HTML
- Check the "Expand Widget Templates" Box
- Search for this,
]]></b:skin>4. Just above it paste the code given below,
.mbt-hyperlink-1 {Make these changes:
background: url(ADD ICON LINK HERE) no-repeat 0px 0px;
padding:7px 0 0 25px;
}
- Replace ADD ICON LINK HERE with the URL of your icon. You can use any of the icons below or all of them. Right Click on any icon and select "Copy Image Location" or "Copy Image URL"


You can also use icons of your preference and save the Images on blogger.
If you wish to use three or four icons simply keep on adding the same CSS code given above by changing only the digit number i.e. 1, 2 , 3 , 4 like this,
.mbt-hyperlink-1 {5. Save your template and jump to the next part of the tutorial
background: url(ADD ICON LINK HERE) no-repeat 0px 0px;
padding:7px 0 0 25px;
}
.mbt-hyperlink-2 {
background: url(ADD ICON LINK HERE) no-repeat 0px 0px;
padding:7px 0 0 25px;
}
.mbt-hyperlink-3 {
background: url(ADD ICON LINK HERE) no-repeat 0px 0px;
padding:7px 0 0 25px;
}
.mbt-hyperlink-4 {
background: url(ADD ICON LINK HERE) no-repeat 0px 0px;
padding:7px 0 0 25px;
}
and so on..........
How it works?
Now for example if you wish to provide a link to your user to download an Ebook, you simply need to add the CSS class to the link i.e class="mbt-hyperlink-1" as shown below,<a class="mbt-hyperlink-1" href="http://xyz.com">Download SEO Guide Tips</a>After you paste the above link in the HTML mode of your blogger editor and publish the post, you will see the Icon appearing next to your link as shown below,

Hope this was clear. If you needed any help just let me know. Peace and blessings! :)
Wednesday, June 15, 2011 0
Subscribe to:
Posts (Atom)


